In this comprehensive guide, we will walk you through the process of creating a well-structured outline for your new content. A thoughtful outline serves as the backbone of any successful content piece, helping you organize your ideas logically and ensuring you cover all essential topics. The process is designed to be intuitive and efficient from start to finish, allowing you to focus on what matters most—creating valuable content for your audience. Let’s dive into the step-by-step process of creating an effective outline!
How To Use The Content Outline
Here is a link to a helpful document on use the Content Outline in Noble. We recommend that you read this either before or after creating an outline.
Create an Outline using AI for New Content
Step 1: Create Content
Before creating an outline, you’ll need to set up your new content piece. Please follow our detailed document on creating new content before proceeding further. This will ensure you have the proper foundation in place.
Step 2: Choose AI option from the Wizard
Once you’ve created your content piece:
- Navigate to the “Let’s Get Started” window
- Select the “AI Generation Content” option from the available choices
- Click the “Start” button to proceed to the next step
The AI-assisted approach streamlines the outlining process by analyzing your topic and suggesting a structured framework based on best practices and competitive analysis.
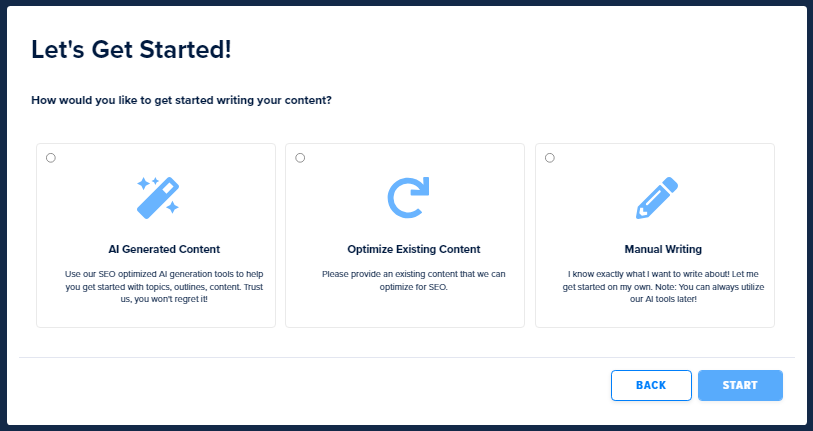
Click the “Start” button
Step 3: Verify Content Settings
At this stage, you’ll need to review and confirm that all content parameters are correctly configured:
- Examine your Competition settings to ensure you’re targeting the right competitors
- Verify your Keyword selection and strategy
- Confirm the appropriate Word Count for your content piece
- Check that all necessary settings are properly configured for your specific content goals
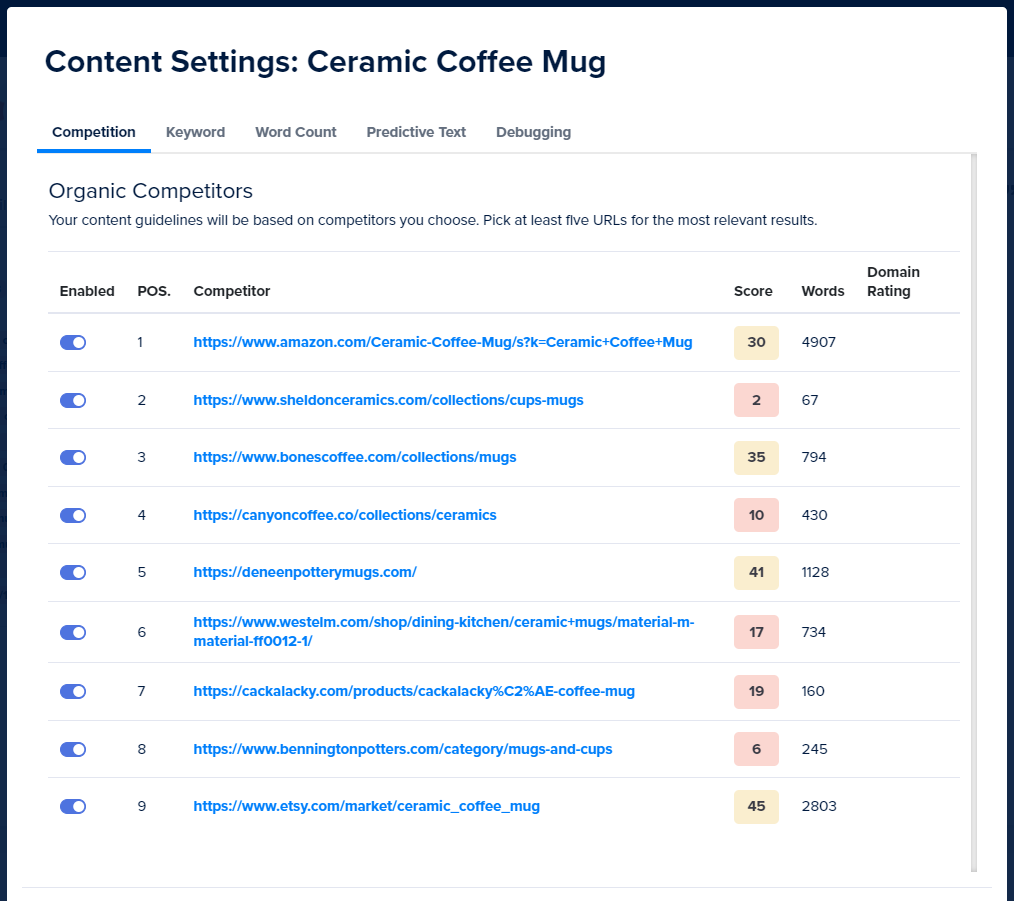
After confirming all settings are correct, click the “Next” button to continue the process.
Step 4: Choose Outline Type
Selecting the right outline type is crucial for creating content that achieves your specific goals. Each outline type is tailored to a different purpose for content. Review the following options carefully to determine which best aligns with your content objectives:
1. Blog
Ideal for informational content including research findings, resource collections, and thought leadership pieces. This outline structure emphasizes educational value and engagement.
2. Semantic SEO
Creates content with exceptional topical depth and comprehensive coverage. This structure is designed to satisfy search engines’ preference for authoritative, complete information on a subject.
3. Landing / Service
Focused primarily on highlighting the benefits and value propositions of your product, service, or offering. This structure prioritizes conversion elements and compelling feature explanations.
4. Product Listing
Specially designed for category pages that showcase multiple products. This structure helps funnel users toward product pages and facilitates easy comparison shopping.
5. Product
A conversion-focused structure that presents detailed product information, specifications, and answers to common questions. Optimized for driving sales of specific items.
6. How-To
Provides a clear, step-by-step framework for tutorials and guides. Perfect for explaining processes, teaching skills, or demonstrating how to use your product or service effectively.
7. Guest Post
A concise blog structure intended for content that will be published on external websites rather than your main domain. Optimized for building backlinks and expanding your audience.
Important Note: The Guest Post option will ONLY appear when the outline for your content is currently empty.
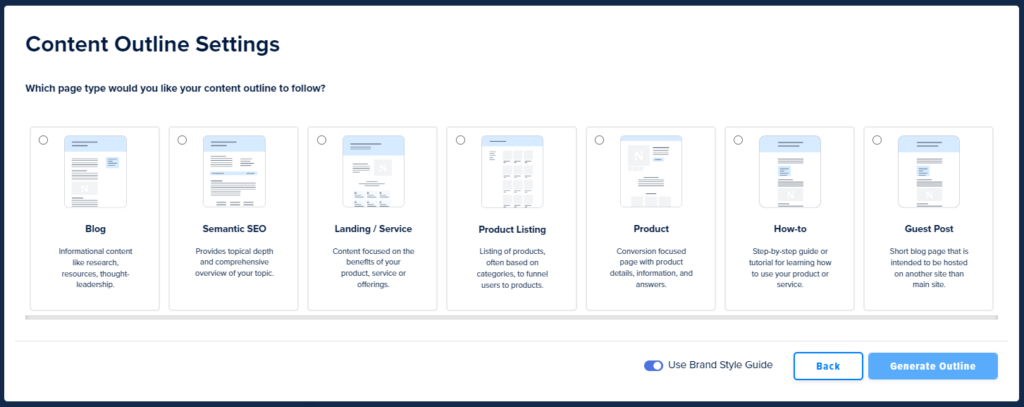
Step 5: Use the Brand Style Guide.
Consistency in brand voice and presentation is vital for establishing a strong identity. At this stage, you’ll decide whether to incorporate your group’s style guide into the outline generation process:
- Review your existing Brand Style Guide requirements
- Determine if this content piece should follow those guidelines
- Toggle the “Use Brand Style Guide” option ON if you want the AI to incorporate your brand’s voice, tone, and stylistic preferences.
- Toggle it OFF if you prefer to create content without these constraints
For more detailed information about creating and utilizing Group Style Guides, please refer to our dedicated documentation on this topic.
Step 6: Generate the Outline:
Now that you’ve configured all necessary settings:
- Click the “Generate Outline” button to initiate the AI-powered outline creation process
- Please be patient, as the generation may take a minute or two to complete
- The AI will analyze your keyword, suggested keywords list, and selected outline type to create a customized structure
- Once complete, you’ll see a window displaying both Competitors’ Topics and the AI-generated outline for your content
The AI carefully balances competitive analysis with your specific content goals to create an outline that positions your content for success.
Step 7: Review / Edit The Generated Outline
The final step in the AI-assisted process is critical for ensuring the outline truly meets your needs:
- Thoroughly examine each section of the newly generated outline
- Add, remove, or rearrange sections as necessary to better align with your content vision
- Refine section headings to better reflect your unique perspective or approach
- Consider whether additional subsections would improve clarity or coverage
- Ensure the outline follows a logical progression from the introduction to the conclusion
For in-depth guidance on editing and optimizing your content outline, please review our helpful document on working effectively with Content Outlines.
Create an Outline Manually for New Content
If you prefer a hands-on approach or have very specific structural requirements, the manual creation option gives you complete control over your outline.
Step 1: Create Content
As with the AI-assisted approach, you’ll first need to establish your new content piece. Please follow our comprehensive document on creating new content before proceeding.
Step 2: Choose the Manual Option From the Wizard
To begin the manual outlining process:
- Navigate to the “Let’s Get Started” window
- Select the “Manual Writing” option from the available choices
- Click the “Start” button to proceed to the Editor interface
Step 3 Open Outline Window:
Once in the Editor:
- Locate the outline button in the top right of the sub-header bar
- Click on this button to open the Outline creation and editing interface
- This will display the outline panel where you can build your structure from scratch

Step 4 Start Writing Outline:
With the outline panel open, you can begin creating your content structure:
- Choose between “List View” or “Text View” based on your preferred working style:
- List View provides a hierarchical, nested structure visualization
- Text View offers a more traditional document-style interface
- Begin adding your main sections (H2 headings)
- Under each main section, add subsections (H3 headings) as needed
- Continue adding deeper levels of organization if required
- Rearrange sections by dragging and dropping to establish the most logical flow
- Review your completed outline for comprehensiveness and clarity.
Benefits of Creating a Strong Outline
Taking the time to develop a thorough outline before writing offers numerous advantages:
- Improved Content Structure: A well-planned outline ensures logical flow and progression of ideas
- Enhanced SEO Performance: Comprehensive outlines help ensure you cover all relevant topics and keywords
- Increased Writing Efficiency: With a clear roadmap, you’ll experience fewer creative blocks during the writing process
- Better Content Quality: Organized thoughts lead to more coherent, valuable content for your readers
- Easier Collaboration: Team members can provide feedback on the outline before significant time is invested in writing
- Reduced Editing Time: Well-structured content typically requires less extensive revision
Tips for Outline Optimization
Whether you choose the AI-assisted or manual approach, consider these best practices for creating effective outlines:
- Begin with the end in mind: Clearly define what you want readers to learn or do after consuming your content
- Research thoroughly: Understand what competing content covers and identify gaps you can fill
- Prioritize user intent: Structure your outline to address why people are searching for your topic directly
- Create balanced sections: Aim for relatively equal depth across major sections when appropriate
- Use question-based headings: Directly addressing reader questions in headings can improve engagement
- Include transitional elements: Note where you’ll need to create smooth transitions between sections
- Plan your calls to action: Identify strategic points to encourage reader engagement or conversion
By following this guide, you’ll be well-equipped to create compelling outlines that serve as the foundation for outstanding content. Remember that a strong outline is an investment that pays dividends throughout the content creation process.